Part 2: Photography with Imre Z. Balint: Episode 10 - 3D Photography
Alright, here we go. Well Episode 10 was indeed a long one, but packed full of 3D goodness for those of you out there wanting to create such photographs. By the way, I accidentally said "red-green" glasses in a couple of sections... really that should be red-blue! If you view my video with the annotations, then you'll see those notes pop up.
Anyway, that aside, I was quite happy with how this episode turned out. As I watched my video again, I really don't know if there is that much more to add. The only thing I can really stress, whether you have the luxury of shooting with two cameras or just one, is the part about trying to get your two photos to look as identical as possible in the sense of focus, exposure, white balance, and alignment (which could really include size; both shots should be essentially the same size). The more discrepancies you have between the two photos, the poorer the 3D effect will become; our brains are just too smart for us to fool gosh darn-it!
But to get the two images to look the same (aside from the angle/position they were taken from) isn't that difficult really, and can even be fixed up afterward in most image editing software. And I'll ride this segway right into recommending that you check out my Photoshop tutorial below on how to put together two images, with the assumption that you'll either be using a stereoviewer like the one I've shown in my video or you'll be employing the parallel viewing technique.
Before moving on though, in my Web Resources section below I've included a link to creating anaglyphs, if that by chance is your cup of tea.
Quick Photoshop Tutorial
As I mentioned in my video, this tutorial explains how I put those left and right images side by side so that you can get a decent 3D effect out of them. Now I'm going to assume that you have a little Photoshop experience, so I won't go into detail about the application itself. Also, I'm going to assume you are using a similar stereoviewer that I have in the video, and that the two photos you have taken are in portrait orientation (in other words the photos are taller than they are wide).
Web Resources
Links are provided "as is" and you are solely responsible and liable for your actions. As a recommendation, always be sure you virus check any software you download (and don't download any software you don't trust), and be sure you do your research before buying from any online store.
http://www.triplespark.net/render/stereo/methods.html
http://www.stereoscopy.com/downloads/
http://www.stereoeye.jp/software/index_e.html
http://www.opentutorial.com/Make_3d_images
http://www.3dstereo.com/viewmaster/sv.html
http://en.wikipedia.org/wiki/Anaglyph_image
http://www.your3dsource.com/how-3d-movies-work.html
http://www.imax.com/sacramento/theatreinformation/imaxexperience.htm
P.S. Here are those 3D images mentioned in the tutorial above:


Anyway, that aside, I was quite happy with how this episode turned out. As I watched my video again, I really don't know if there is that much more to add. The only thing I can really stress, whether you have the luxury of shooting with two cameras or just one, is the part about trying to get your two photos to look as identical as possible in the sense of focus, exposure, white balance, and alignment (which could really include size; both shots should be essentially the same size). The more discrepancies you have between the two photos, the poorer the 3D effect will become; our brains are just too smart for us to fool gosh darn-it!
But to get the two images to look the same (aside from the angle/position they were taken from) isn't that difficult really, and can even be fixed up afterward in most image editing software. And I'll ride this segway right into recommending that you check out my Photoshop tutorial below on how to put together two images, with the assumption that you'll either be using a stereoviewer like the one I've shown in my video or you'll be employing the parallel viewing technique.
Before moving on though, in my Web Resources section below I've included a link to creating anaglyphs, if that by chance is your cup of tea.
Quick Photoshop Tutorial
As I mentioned in my video, this tutorial explains how I put those left and right images side by side so that you can get a decent 3D effect out of them. Now I'm going to assume that you have a little Photoshop experience, so I won't go into detail about the application itself. Also, I'm going to assume you are using a similar stereoviewer that I have in the video, and that the two photos you have taken are in portrait orientation (in other words the photos are taller than they are wide).
- Take the two photographs you've shot and load them up in Photoshop (make sure you know which is the left and right image).
- Drag one of the images onto the other, which should automatically create a layer for you. In other words, you should now have a single file with two layers, one with the left image, the other layer with the right image. Rename the layers accordingly for the left and right photo. Probably a good idea to save your file (use Photoshop's format to retain layers).
- You should now have two pictures sitting right on top of each other, NOT side by side... yet. We'll get to that in a bit.
- Start with either image and level it out if necessary. A quick way to do this is to select the layer you want to edit and then hit CTRL+T, which is short for Edit menu > Free Transform. Now if one your layers says "Background", you'll need to double-click on it and give it a name, otherwise you won't be able to rotate or move the picture around. By the way, you can click on the eyeball icon in the layer's palette to turn off the layer you're not working with. Also be careful that you do not resize your image; just level it out by rotating the photo a little and this is something that I just estimate by sight.
- Once you've finished straightening out the image, do any color corrections to it if necessary BEFORE straightening out the second image. Here's why I do this. By touching up the first image to exactly how I want it to look like (leveling it out and color correcting), I can use that image as a reference when editing the second image.
- If you're at this step, you're ready to edit the second photo. Now here's what I do. I move the second photo's layer to the top (so above the image you've already fixed up), and then I change the layer's opacity to about 50 or 60%. This way, when I level out the second image to match the first, I can see the bottom image show through a little.
- So rotate the second image as much as needed to match the first (use references in your image to do so; for example, if you took a shot of flowers, then matching up the angle of the stems might be helpful).
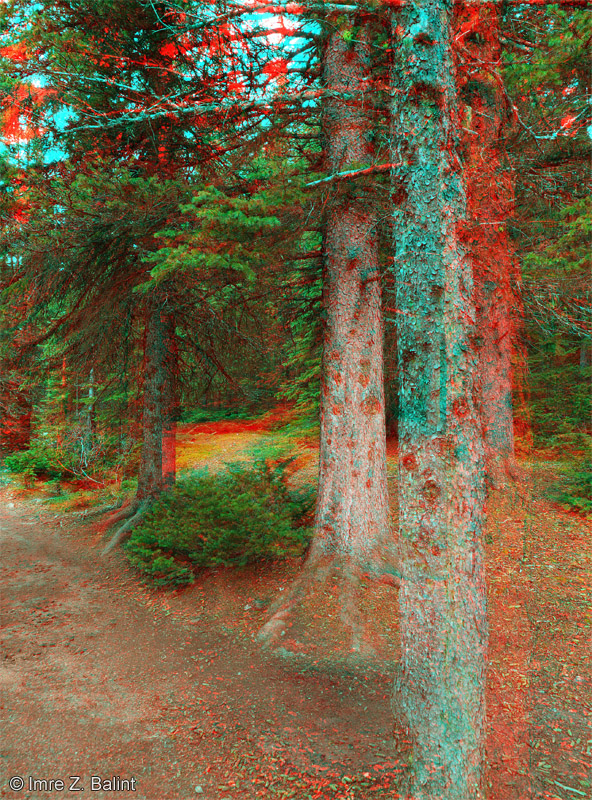
- Once you've leveled the photo, now it's time to move it into place. Here's what I mean. Remember in the video how I talked about taking your two shots around a center point? Well now you have to line up the two images so that the center point of both images match. To better illustrate this, take a look at this 3D anaglyph (don't worry that it's the blue-red variety; that's not important here); scroll to the bottom of this post or click this link: http://farm3.static.flickr.com/2701/4286277851_572d27f9bf_o.jpg Notice how the tree nearest the middle doesn't really have a blue or red ghostly image next to it, but the tree close up and to the right does as well as the tress in the background further off to the left? Ok, so hopefully you know what I mean by moving the second image over the first to where those center points match as best as possible. Use the arrow keys to nudge the image pixel by pixel if necessary. The closer they match, generally the better the effect.
- Ok, now you can turn the opacity of the second image back to 100%. Don't worry if the images are no longer perfectly over top each other, we'll fix that in a bit. Now your task is to color correct the second image to match the first if necessary.
- Almost there! Now select your crop tool. In the crop toolbar that should appear (near top of screen), enter "3 in" in the width textbox and "4 in" in the height textbox. If you see any value in the "Resolution" field, delete it. This ensure that the full resolution of your photos are retained; a good thing when printing the final image.
- You guessed it, crop your picture! There is where you can cut off those parts that no longer overlap, or where the background shows through due to how your photos might have been rotated. When you finish cropping, ensure that no "gaps" remain on any layer; in other words, both photos extend completely to the edge of the image frame.
- Select the Image menu and then "Canvas Size...". Because you cropped your photo to be exactly 3x4 inches, that's what you should see in the width and height textboxes (switch the units to inches if you have to).
- Click on the left-middle arrow in the "Anchor" section and change the width to 6 inches. Click ok.
- You should now see that your canvas is twice as wide as it used to be, with both of your photos sitting on top of each other on the left-hand side.
- Select the layer that represents your right-eye photo, and you guessed it, move it right to fill up the empty space on the canvas. If you have the Snap feature on (under the View menu), then the layer should snap to the edge of the image frame.
- Save your masterpiece and print it out! Hopefully it worked well for you. At the bottom of this post I've included my 3D downtown photo, so you can have a clearer idea of what the end result should more or less look like. Actually, if you use the parallel viewing technique on that picture, you might be able to see it in 3D.
Web Resources
Links are provided "as is" and you are solely responsible and liable for your actions. As a recommendation, always be sure you virus check any software you download (and don't download any software you don't trust), and be sure you do your research before buying from any online store.
http://www.triplespark.net/render/stereo/methods.html
http://www.stereoscopy.com/downloads/
http://www.stereoeye.jp/software/index_e.html
http://www.opentutorial.com/Make_3d_images
http://www.3dstereo.com/viewmaster/sv.html
http://en.wikipedia.org/wiki/Anaglyph_image
http://www.your3dsource.com/how-3d-movies-work.html
http://www.imax.com/sacramento/theatreinformation/imaxexperience.htm
P.S. Here are those 3D images mentioned in the tutorial above:


Comments
Post a Comment
You may comment, but if it's spam or advertising, I'll be deleting your comment and blocking your arse!